MissionViewTM Software Download
This page describes how to download/install MissionView Display software.
Download the software by selecting either:
- The MissionView Users Manual is included as part of the above software install, but it can also be downloaded in advance: MissionView Users Manual.
MissionView Display – Quick Start Instructions
MissionView consists of two software applications: MissionView Display and MissionView Designer. These instructions describe installing MissionView Display which offers management of multiple NetAcquire servers and convenient configuration, status, and control. MissionView Display also optionally includes advanced data display of drawings consisting of various graphical elements created by MissionView Designer.
Quick Start
Once MissionView Display is installed, to add a NetAcquire server, click the Servers menu and then click Add… Type in a NetAcquire server hostname or IP address, and click OK. The Servers Management window will open and show the status of the connection.
Click the Servers menu and find the server added above. This new menu entry contains the menu items for opening configuration/status pages on the server.
Operation and Demos
The following sections provide a quick walk-though of some basic usage of MissionView Display and MissionView Designer, starting with opening an existing demonstration drawing and then showing the creation of a simple drawing in Designer and loading that drawing in MissionView Display.
MissionView Display with Demo Drawings
Start MissionView Display. If you have previously used MissionView Display, the application will open to your last layout.
During installation, if the “Open demo drawings” option was selected, demo drawings will automatically appear in your current layout.
Alternatively, click the File menu, then click Open Layout… and open the example layout demo.mv found in your Documents/MissionView folder. The following display will appear:

The real-time chart in each drawing has interactive features that can be accessed via mouse clicks for scrolling, zooming, etc.
Right click any graphical objects in a drawing to explore and configure display properties.

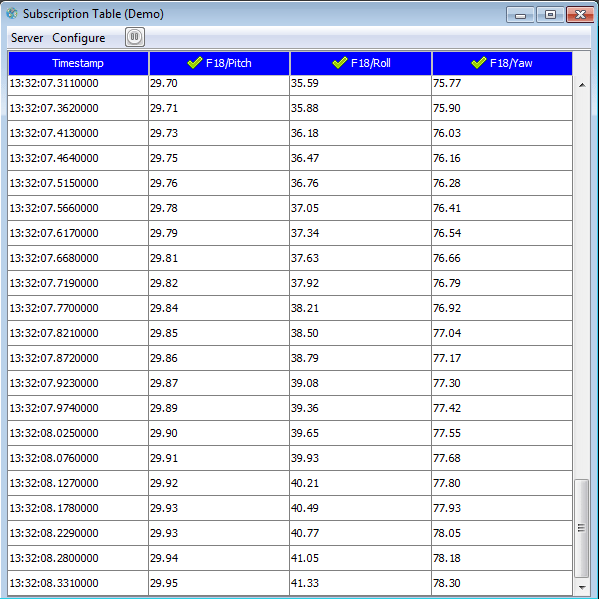
Demonstration: Subscription Table Display
To open a subscription table display, click the Open menu and click Subscription Table.
In the resulting Subscription Table window click the Server menu then click Connect…, then select the Demo hostname.
Click the Configure Subscriptions… button in the middle of the Subscription Table window and select subscription names to display. The F18 and Satellite groups can be expanded by clicking on the “+” sign to see more subscriptions. Click the OK button to view subscriptions.
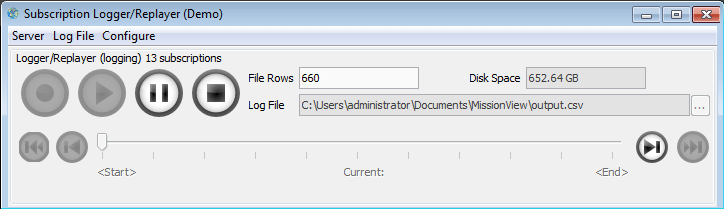
Demonstration: Subscription Logging
To open the logger user interface, click the Open menu and click Subscription Logger/Replayer.
In the resulting Subscription Logger/Replayer window click the Server menu then click Connect…, then select the Demo hostname.
Click the Configure menu and then click Subscriptions… and select subscription names to log. Selecting the F18 or Satellite domains will select all subscription in that domain for logging. Click the record (button with red circle) to start recording.
Optional Demo: Add NetAcquire Servers
To add a NetAcquire server, click the Servers menu and click Add… Type in a NetAcquire server hostname or IP address, and click OK.
The Servers Management window will open and show the status of the connection.
Click the Servers menu and find the server added above. This new menu entry contains the menu items for connecting a drawing or opening configuration/status pages on the server.
Click on System Management then Time Change & Source and the configuration page will open in a window. Using the mouse, move this window so both it and other windows can be seen at the same time.
Click the File menu, then click Save Layout As…, then choose a name for this layout. Saving the layout creates a layout file (.mv). You can create different layouts to serve various purposes and include specific windows.
Optional Demo: Displaying A Drawing
Start MissionView Display.
Click the Servers menu, then click Demo, and finally Drawing…, then navigate to your drawing.
Click Open to open the drawing with a connection to the “Demo” server.
Once the drawing has opened you will see a window with a dial. Right-click the dial to bring up the dial’s configuration.

Click on the Ellipses (…) button for the property “Value” to open the Publication selection dialog. Select “Sine m60” and click Link Publication.
The dial will immediately begin displaying the value from the Demo server’s publication (sine wave moving from -60 to 60).
Close the dialog when finished or you may make additional changes that get reflected immediately in the dial.